Say good-bye to the old days of trying to find access to a computer, scanner and/or fax machine to get your CDL, TWIC Card, Proof of Insurance, and other commonly requested documents to your recruiter. Now, you can securely upload, store, and send your documents directly to your recruiter from the Pulse app.
For example – if a recruiter from Company A asks for a copy of your SSN Card, you’ll get a notification from Pulse letting you know. After just a few taps, they’ll have your document in front of them. Pulse also has added a new document storage feature, so that if a few days later a recruiter from Company B requests that same document, all you have to do is go ‘Send Documents’, tap the document, and you’re done. Simple!
We’ve put together a quick walk-through along with helpful screenshots to show you how easy it is to use the documents feature in Pulse vs the traditional time-consuming (and often frustrating) method you’ve known in the past.
Let’s say a recruiter sends you a request for a copy of your SSN Card:
1- The Pulse App will notify you on your phone, alerting you to the recruiter’s request. (The red-numbered badges (circles) in the right-hand corner will help guide you along the way.)
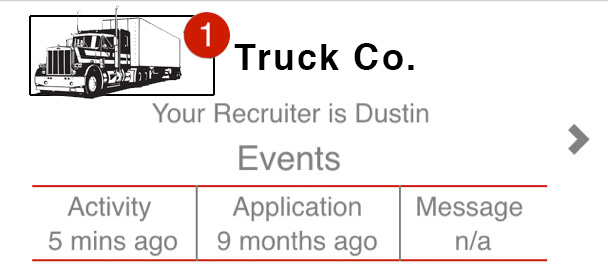
2- Upon opening Pulse, you will see a top card like the one below, letting you know you have a pending item requested from a company.
3 – Tap on either the top card (above) or the company card (below). The number in the red badge will show you the number of documents they are requesting.
4 – Next, you’ll see the red badge on a new ‘More’ button – tap there.
5 – This will open your Carrier Detail Activities. You’ll now see the badge on the ‘Documents’ bar, indicating you have a request. Tap it.
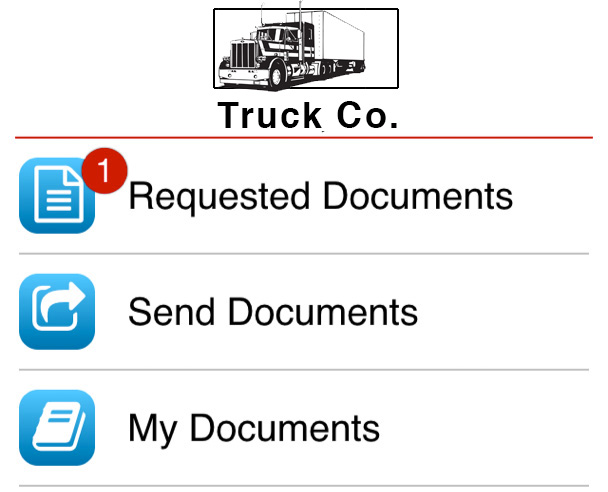
6 – You’ve now made it to your ‘Documents’. Here, you have three options, as shown in the screenshot below.

7 – Let’s tap ‘Requested Documents’, since that’s where the red badge is. (We’ll come back to the other two options in a minute.)
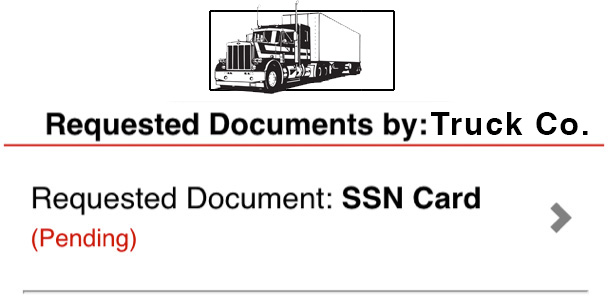
8 – Under ‘Requested Documents’, you will see a listing of the requested documents. Tap on the “Requested Document: SSN Card (Pending)”. The word ‘Pending’ in red means the recruiter is waiting on you to fulfill the request.

9- Finally, you’ll see the ‘Upload Documents’ screen. You can either take a picture using the camera on your phone, or you can select an existing photo already in your photo library. Then, press the red Upload button.
10 – And that’s it! Done.
One of the coolest features of this new functionality allows you to ensure that the document actually made it to your recruiter. Once you’ve uploaded the document, you will see a yellow processing notification like the one below.
Tap it, and it will refresh to show you how long ago it was sent, and when it was uploaded, as shown in the screenshot below.
So, what about the other two options, ‘Send Documents’ and ‘My Documents’? These are where you’ll find the greatest convenience. ‘Send Documents’ will allow you to send existing documents (that you’ve previously sent) to a requesting carrier, while ‘My Documents’ is a convenient place for you to store all of your documents in one place – when a carrier does make a request, you have everything ready to go.
We know how important your time is – that’s why our goal is to add more and more value to Driver Pulse to make getting a job easy, so you can spend your time on the things that matter in life.
You’ll want to know what’s coming next – like our page on Facebook so you can stay on top of all the great things we’re doing with Driver Pulse. We’re adding new features and functionality all the time based on feedback from drivers all over the country. If you have any feedback for us on how we make Pulse even better, we’d love to hear from you, too. Leave your comments below!


